the first thing that I do when learning korean language is installing the east asian language in my laptop, this article is taken from http://learnkorean.128pro.net.
You don’t need to download or install any kind of software. Actually, Windows (if you are using Windows Operating System) itself already provide this. All you need to do is to activate it. But to do this, you will need to provide your Windows XP installer CD, and you will have to log in as Administrator. Here, I’ll explain to you how to activate this feature, but the example I give will valid only for Windows XP. For Windows Vista or Windows 7, the steps maybe less similar.
1. It’s better for you to insert your Windows XP CD installation in your CD/DVD drive now.
2. Go to Start button -> Control Panel.
3. On control panel page -> c;ick icon “Regional and Language Options.”
4. After you click it, you’ll see a pop up “Regional and Language Options” dialog box.
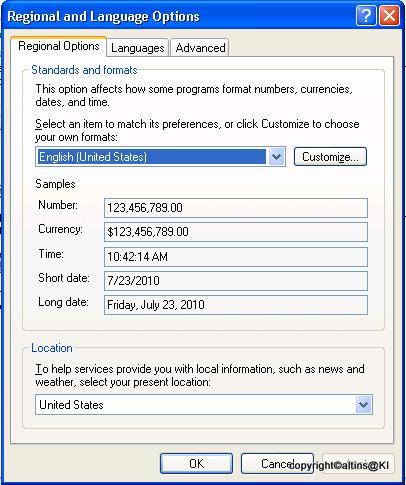
5. Choose tab “Languages”
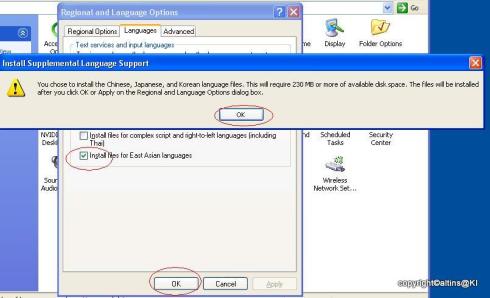
6. Normally you will see, in “Supplemental Language Support”, there are two unchecked checkboxes. All you need to do is check the “Install files for East Asian languages.”
7. There will be copying process, like the image below.
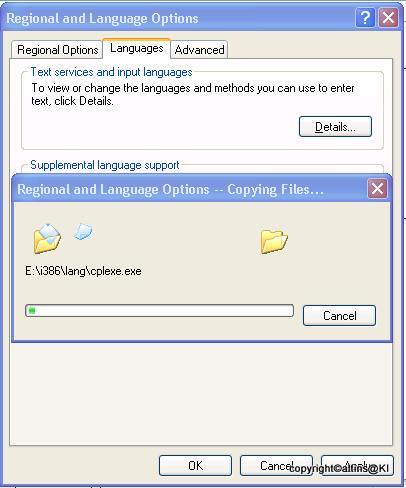
If you haven’t insert your Windows XP installer CD, you will face a error dialog box like this one

8. During the copying process, sometimes you will see a dialog box asking you to choose the correct file. File like “_XDLBBG.” (Just file name example, it doesn’t have to be the same though). You will have to direct them to the right folder in your Windows XP installer CD by just clicking Browse button. If you see in your Windows XP installer CD, there will be folder “I386”. Mostly file that you need during copying process is in that folder. (Sorry, I don’t have the image, since this doesn’t happen in my installation process, hehehe).
9. After that you may need to restart your computer.
10. now, your computer has feature to understand east asian languages. Congratulations!
Your computer now can read the character, but it doesn’t recognize Korean keyboard as the input device. Have no fear!!! Because it’s so easy to set up your “normal-keyboard” into Korean-keyboard one. You don’t need to go to Seoul just to buy Korean-keyboard. Hehehe..;)
1. Repeat step 2, 3, 4 and 5.
2. Click button “Details”.

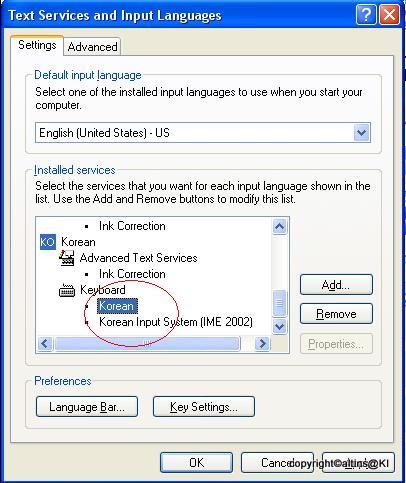
You will see “Text Services and Input Languages” dialog box like the image below.
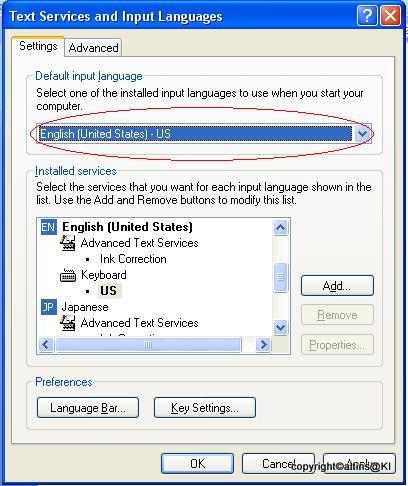
3. By default, your computer input language is “English (United States) – US”. You will need to add new input services, so that you can input korean font. Click button “Add”

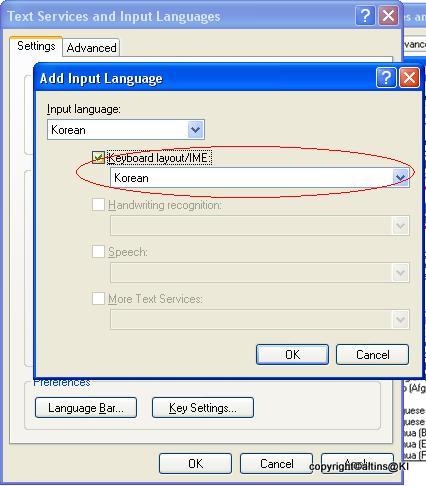
4. You will see “Add Input Language” dialogue box. Choose “Korean” from dropdownlist.

5. Check the checkbox “Keyboard layout/IME”, and choose “Korean”. Click “OK”.
6. You will see in “Korean” language part, the keyboard part is now has “Korean”. You need to add “Korean Input System (IME 2002)” too.
7. Now, your computer recognize korean font as the input (Woohooo!!!..:) ) . But how can you tell your computer when you type on your keyboard, you want to type korean font. This is where the position “Language Bar”.
How to activate your “Language Bar”, so that you can switch easily between typing Latin font or Korean font.
1. Right click in your taskbar. You know taskbar…the blue line where the “Start” button are located. Choose menu “Toolbars” -> “Language Bar”.

2. You may find your “Language Bar” in minimize mode in the right of the taskbar.

3.Click on the “Restore” to see your “Language Bar” in full mode.
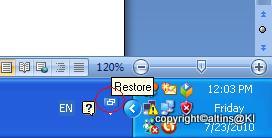
4. Then you will see, your “Language Bar” in full-mode. By default, your input mode will be “EN English (United States)”.

5. Click on the language to choose different input. You will see there are two input services. KO for Korean, and EN for English. Choose “Korean”.

6. Now, your language bar is different, right?

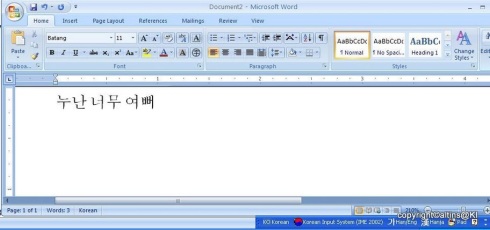
7. If you want to type in font-Korean mode, just click the third, it will change into something like the image below.

8. Now you can type like this in your Ms.Word or even your browser.
The image below is the image of what Korean keyboard suppose to look like.

With a little creativity, you can “decorate” your keyboard to mark Korean font. All you need are label or white paper and glue or cellophane tape. And now you know which font are in which button of your previously-normal-keyboard. Hehehe…;)
The image below is my pc-keyboard, and my netbook keyboard.

Credit : altins@KI
댓글 없음:
댓글 쓰기